Memory Diagnostic Scan
This section will walk you through creating a bootable memory test to make sure your RAM is not bad.
What You'll Need
1. Windows Access
2. Internet Access
3. Flash drive that you'd be able to wipe
Step 1: Download Memtest86+
Memtest86+ is one of the better programs on the market for diagnosing memory problems.
You can download it at http://www.memtest.org/download/5.01/memtest86+-5.01.usb.installer.zip
Step 2: Extract Files
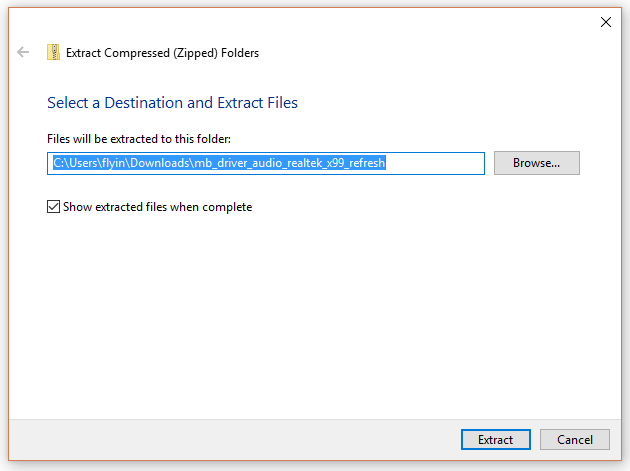
If you try to run the program without first extracting the folder it's in, you are going to run into trouble getting it to work properly. Find your files in your downloads folder (If you can't find it, delete everything from your downloads folder, and re-download it so it's the only option left) and right click on the zipped folder (Should say "Memtest86-usb.zip) and go to "Extract All". Leave the box checked to show the extracted files upon completion. The images below show how to extract a sample zipped folder.


Step 3: Run Memtest86+ USB Installer
Double click on the program to run it. A box will pop up asking to grant permission. Hit Yes. It will then bring up a page to accept the license terms. Select "I agree" to continue.

Step 4: Select Drive; Write to drive
NOTE THAT THIS WILL ERASE EVERYTHING ON THE FLASH DRIVE.
Select your flash-drive. Any flash drives currently plugged into the computer will show up in that white box in the picture below.
Once you've done that, Check the box that says to "Check this box if you want to format the Drive". Then hit "Create" to make the flashdrive.

Step 5: Insert Bootable Media, and Shut Down The System
Place your DVD in the drive, or plug your bootable USB in. Then shut down the system.
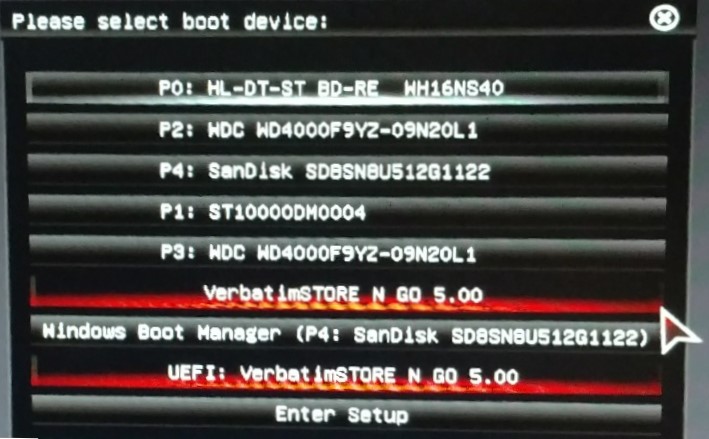
As you turn the system back on, you'll start tapping a key (Below) repeatedly as fast as you can until it brings up a Temporary Boot Menu for your system. You may need to try a few different times if you don't get it the first time; The time period in which it accepts the input is pretty short. The key pressed depends on your specific system. If you know what brand of motherboard you have, it will most likely be the following keys:
- Xidax/Sager Laptop: F7
- MSI Motherboard: F11
- Asrock Motherboard: F11
- Gigabyte Motherboard: F12
- Asus Motherboard Desktop: F8
Step 6: Select your Bootable Media
The Temporary Boot Menu will look different depending on what kind of system you have. We are going to want to identify what our bootable looks like in the menu.
DVD: If you are using a DVD, you are going to be looking for the DVD drive. Take a look at each option, and see if anywhere in the option you see anything like "DVD" or "DVDROM".Your DVD drive probably shows up twice, select the option that DOES say "UEFI" in the front of it if possible. The system will then pop up a message saying to press any key to boot from the DVD. Make sure to press a key and it should work.
FLASH DRIVE: If you are using a flashdrive, it will most likely show up as the brand of the flashdrive you are using. Your bootable device will probably show up on the menu twice. One option will say "UEFI" in the front of it, and one will either say "SATA", "P#" or something else in the front of it (It might also say nothing in the front). IF it shows up just once, then select whichever option shows up. If it shows up twice, usually you'll want to hit the option that says "UEFI" at th front of the name. (Ignore other devices that say UEFI at the front of them)
If you don't know which is the correct option come back to this menu and go through the list sequentially until it takes you to the next step. If you have trouble during the reinstall itself for any reason, if your device showed up twice, then come back to this menu and choose whichever option you didn't before. If you can't get your bootable to boot at all, then you'll want to create your bootable again using a DIFFERENT flashdrive and possibly a different computer.

Step 7: Let the test run
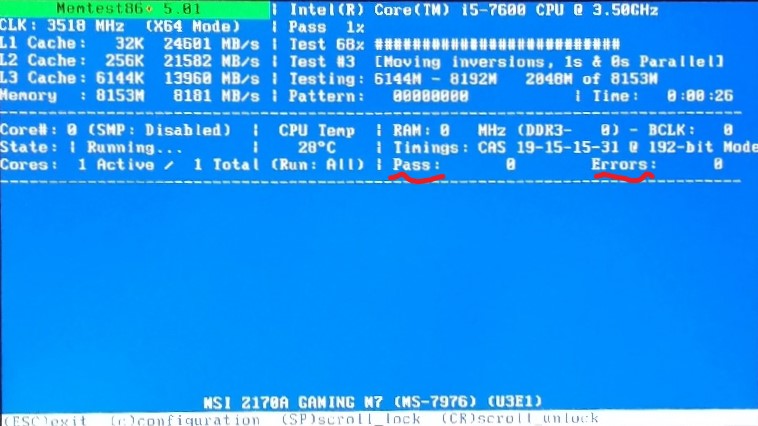
The test will start automatically once you boot from the flashdrive. It can take a while to run; anywhere from 30 minutes to several hours depending on how much RAM you have in the system and your specific CPU. If it takes a while, don't worry, Just be patient.
On the screen below you'll see a screen-shot of the test running. The top right corner shows the current progress for the current pass and the current test. The test will run forever if you let it, so you'll want to manually shut off the system after at least 2 full passes. The only other thing that you need to look out for is the item in the bottom right corner that reads "Errors". If ANY errors pop up during the test, then you most likely have at least one bad RAM stick in your system.

Step 8: Did you get any errors?
If you got any errors, then we'll need to figure out what is giving you those errors. To know for sure, we need to rule a few things:
1. We need to rule out each stick individually
2. We need to rule out each slot that they are in.
Before you mess with your RAM in your system, check your manufacturer's warranty. Most manufacturers will void your warranty if you access the system without their express permission
Once you have permission, it's usually best to take out all of the RAM sticks except for one (Note that some motherboards are picky on the slot you can have RAM in if you are only doing one stick; make sure to check the manual in case you have any problems.) With just the one stick you'll run the test again. Do this for every stick you have. If only one stick fails in a single slot, then you found which stick is your bad stick, and you can remove that from your system. If all of the sticks give you errors, then most likely that specific slot is bad on your motherboard. You'll either want to replace the board, or use different slots on the board with your RAM. If none of the sticks give errors in a given slot, then you'll want to start testing the other slots. Add one stick at a time to the system until you get an error. Once you've found the suspected slot, you may want to test different ram configurations with different sticks to make absolutely sure it's a bad slot.
Once you think you've found what is your bad RAM stick or slot, it's always good to double check. Make sure to rule everything out that you possibly can. Try the bad stick in different slots, and try different combinations of RAM in a slot to make absolutely sure of what the issue is.
Step 9: RMA the bad part!
An RMA is a a "return merchandise authorization". It basically stands for the process of getting a replacement item covered by the warranty. Most products in your system will come with some kind of warranty, and you can check with the manufacturer to find out exactly what's covered. If you built your own system, then you can RMA your RAM or Motherboard through the original manufacturer (Not the store you bought it from). If you Google the manufacturers name you'll usually find their support page where you can create an RMA ticket.
If you got your system from a manufacturer; you'll want to contact them directly; some of them will require the system to be sent in to replace the parts in a statically safe environment. DO NOT do anything without first contacting your manufacturer.
For most RMA's you'll pay shipping, but the system/part manufacturer will cover the cost of the part itself. Usually they have you send the faulty part in, and as soon as they receive it they'll send the new part out to you. You often can do a cross-ship by paying a deposit of the full value of the new item in order to get them to send the replacement part out immediately; but you'll have to check with your manufacturer to see if that's an option.