How to do a Fresh Install of Windows 8
This section shows you how to do a complete fresh reinstall of Windows 8!
NOTE THAT THIS WILL ERASE EVERYTHING ON
YOUR C: DRIVE INCLUDING PROGRAMS, GAMES, AND PERSONAL FILES.
If you need to backup data before you get into windows, then take a look at THIS LINK here.
Note that most of the images for this guide say windows 10 on them. That is because the process is nearly identical between the two operating systems for the installation process.
What You'll Need
1. Some form of Bootable media to install with. If you don't have one, we'll want to make one HERE. If you have one that's a little older you may want to create a new one; Less updates means less a chance of corruption on your fresh load of Windows.
Step 1: Insert Bootable Media, and Shut Down The System
Place your DVD in the drive, or plug your bootable USB in. Then shut down the system.
As you turn the system back on, you'll start tapping a key (Below) repeatedly as fast as you can until it brings up a Temporary Boot Menu for your system. You may need to try a few different times if you don't get it the first time; The time period in which it accepts the input is pretty short. The key pressed depends on your specific system. If you know what brand of motherboard you have, it will most likely be the following keys:
- Xidax/Sager Laptop: F7
- MSI Motherboard: F11
- Asrock Motherboard: F11
- Gigabyte Motherboard: F12
- Asus Motherboard Desktop: F8
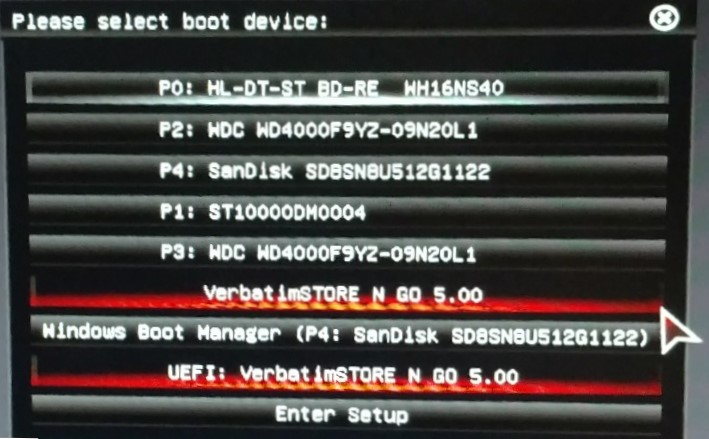
Step 2: Select your Bootable Media
The Temporary Boot Menu will look different depending on what kind of system you have. We are going to want to identify what our bootable looks like in the menu.
DVD: If you are using a DVD, you are going to be looking for the DVD drive. Take a look at each option, and see if anywhere in the option you see anything like "DVD" or "DVDROM".Your DVD drive probably shows up twice, select the option that DOES say "UEFI" in the front of it if possible. The system will then pop up a message saying to press any key to boot from the DVD. Make sure to press a key and it should work.
FLASH DRIVE: If you are using a flashdrive, it will most likely show up as the brand of the flashdrive you are using. Your bootable device will probably show up on the menu twice. One option will say "UEFI" in the front of it, and one will either say "SATA", "P#" or something else in the front of it (It might also say nothing in the front). IF it shows up just once, then select whichever option shows up. If it shows up twice, usually you'll want to hit the option that says "UEFI" at th front of the name. (Ignore other devices that say UEFI at the front of them)
If you don't know which is the correct option come back to this menu and go through the list sequentially until it takes you to the next step. If you have trouble during the reinstall itself for any reason, if your device showed up twice, then come back to this menu and choose whichever option you didn't before. If you can't get your bootable to boot at all, then you'll want to create your bootable again using a DIFFERENT flashdrive and possibly a different computer.
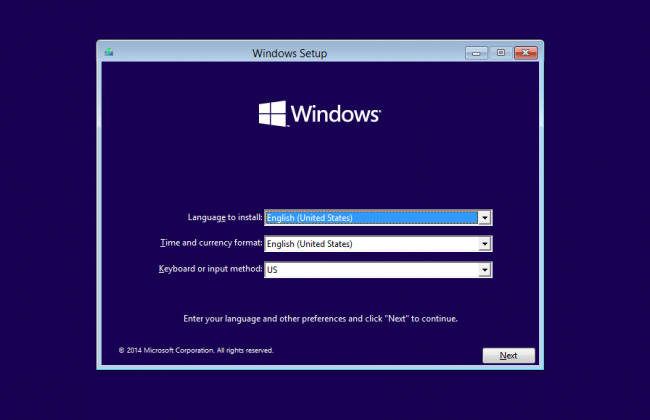
Step 3: Choose your Keyboard Layout and Language
This menu might take a while to come up. It will definitely take longer than your system normally takes to boot. So if it doesn't come up right away when you choose your bootable device, you might just need to wait a little longer
Step 4: Select Install Now
We don't want to select Repair your computer here.
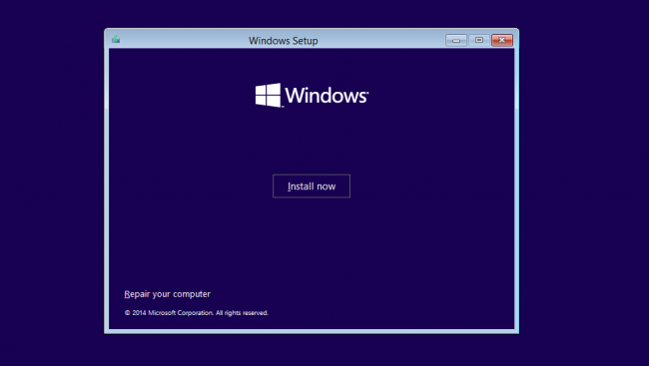
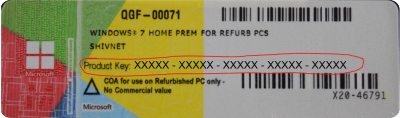
It will then ask you to type in your license key. That key is usually going to be on the back, side, or bottom of your system. If you don't have it, you may need to contact your system manufacturer. (Note that some newer systems will have BIOS injected keys. The installation should not prompt for a key if this is the case)
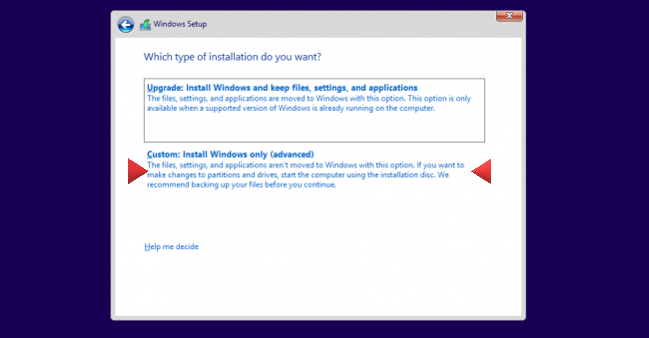
Step 5: Select Custom Install
Don't select Upgrade; It will give you an error and you'll have to go back and choose Custom.
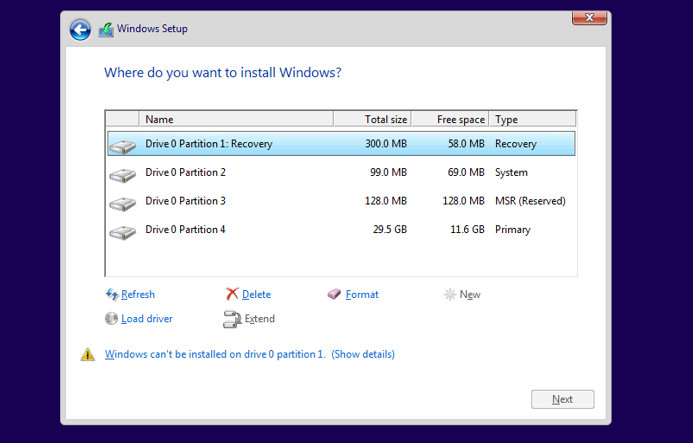
Step 6: Delete Partitions for your C: Drive
This step will erase ALL data on the drive that we are deleting the old partitions on. We are completely wiping the drive, so it's important to remember that nothing on that drive is going to retain through the reinstall. Both files and programs will be erased! If you have data on other drives, as long as you don't delete the partitions for those drives, that data should be untouched. If you need to backup data, take a look at THIS LINK here.
If you just have one drive in your system, this part is pretty easy. If you look at the page we are currently on, you are going to see that each option has a Drive number, and a partition number (A partition is basically just a organized section on a specific drive). You can see in the image below that because all of the options start with "Drive 0" that we only have one drive in our system here. If you have more than one drive installed in your system, you are going to want to add up the total size of the different partitions for each drive. (You can type what it shows the total size to be into Google exactly how they appear with a + between them and Google will do the math and conversions for you). If for some reason you can't figure out which drive is which, you can always shut down your computer and unplug any drive that you don't want to show up in this menu.
Once you identify which drive is your C drive, you are going to highlight each partition one at a time, and then hit the delete option below. Once you delete it, it will turn into an option with the same drive number, but instead of listing a partition it will say "Unallocated Space". We want that to be the ONLY option left for our C: drive. (If you want to erase everything on your other drives too, you can delete all of the partitions for those drives as well; so it lists all the drives as unallocated space)
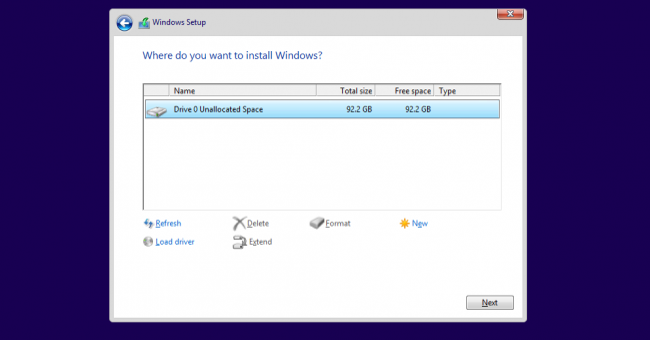
Step 7: Select Unallocated Space and hit NEXT
Make sure your C: drive only has the one option, "Unallocated Space". Select that option, and hit next. This will begin installing Windows 8 onto that drive. If for some reason it gives you an error, you may just need to restart the computer and try again. If your bootable shows up twice on that temporary boot menu, you may want to try the option you haven't tried yet as well. If you still can't get it installed, create your bootable media fresh with a different flashdrive using THIS LINK here.
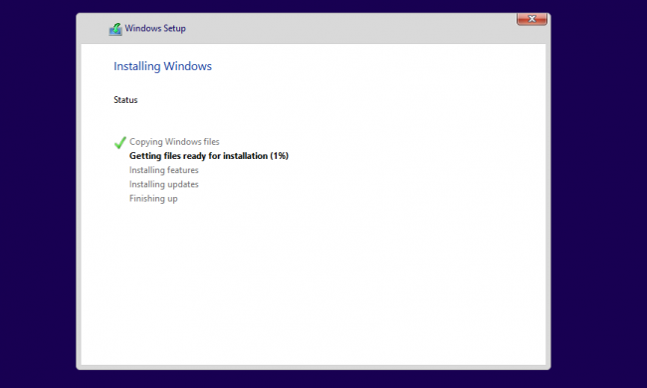
Step 8: Wait for it to finish Installing
It will take a while to finish. Once it does it should restart the computer automatically and take you to Windows Setup. If for some reason it takes you back to your flashdrive or the DVD, simply remove your bootable, and restart the computer again.
WAIT! You Aren't Done Yet!
Once it takes you into windows, after you choose all your options and get to the desktop you are going to have to install your drivers. Most people will just have drivers for your motherboard and for your graphics card; but you may have other devices that need them as well.
WHATEVER YOU DO DO NOT USE A PROGRAM FROM ONLINE THAT IS MADE TO AUTOMATICALLY UPDATE YOUR DRIVERS FOR YOU
Most of those programs don't find the correct or the newest drivers, and many of them install malware. If you have the disks that came with your system originally you can use those to install the needed drivers, although it's actually recommended you find the newest drivers online and install those. The links below will show you how to do that.
Motherboard Drivers
Select here for instructions on finding the newest motherboard drivers online that you can use to install
Graphics Drivers
After you've installed your motherboard drivers, you'll also need to install your Graphics drivers